

![No Longer Available - RPi Intercooler for 2007-13 N54 BMW 335i/335is [E90/E92/E93] RP-IN103](https://cdn11.bigcommerce.com/s-ldaxybx767/images/stencil/1280x1280/products/32379/155400/_1218458282__21929.1583263912.jpg?c=3 "No Longer Available - RPi Intercooler for 2007-13 N54 BMW 335i/335is [E90/E92/E93] RP-IN103")
![No Longer Available - RPi Intercooler for 2007-13 N54 BMW 335i/335is [E90/E92/E93] RP-IN103](https://cdn11.bigcommerce.com/s-ldaxybx767/images/stencil/500x659/products/32379/155401/_1218458234__65491.1583263912.jpg?c=3 "No Longer Available - RPi Intercooler for 2007-13 N54 BMW 335i/335is [E90/E92/E93] RP-IN103")
![No Longer Available - RPi Intercooler for 2007-13 N54 BMW 335i/335is [E90/E92/E93] RP-IN103](https://cdn11.bigcommerce.com/s-ldaxybx767/images/stencil/500x659/products/32379/155402/_1218458296__02836.1583263912.jpg?c=3 "No Longer Available - RPi Intercooler for 2007-13 N54 BMW 335i/335is [E90/E92/E93] RP-IN103")
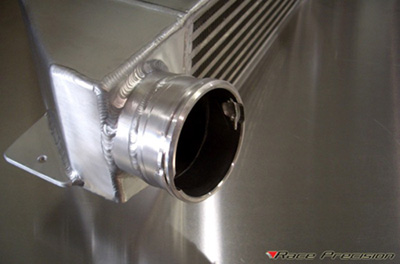
| Race Precision Front Mount Intercooler | |||||||
| A cooler intake charge means a more dense intake charge. A dense intake charge means there is more oxygen to combust, more oxygen to combust means a bigger explosion, and a bigger explosion means more smiles! With Race Precision's Front Mount Intercooler you will gain just that. Designed by RPi, this Bar and Plate design front mount intercooler is crafted from aluminum with billet CNC machined end bolts fitted to stock components so no modifications need to be made on installation. The colder the air entering the engine the more HP as its a denser charge with more oxygen and fuel. BUT do not get this mixed up with air temps at the air filter, as this is only marginal in changes effecting the BIG increases in temps when the air is compressed in the turbo. It is only possible to change the air filter inlet temps by a couple of degrees and this is marginal on effect of performance. The temperature before the intercooler is very high and thus easily reduced as the difference between inside and outside temps of the intercooler are large. (The larger the difference the easier to effect change) | |||||||
|
| |||||||
| | |||||||
| |||||||
| Application Guide | |||||||
Make | Model | Chassis | Year | Part No. | |||
| BMW | 335i | E92 | 07-10 | RP-IN103 | |||
| BMW | 335i | E90 | 07-10 | RP-IN103 | |||


| Dyno Sheets |
 |
 |
 |
 |
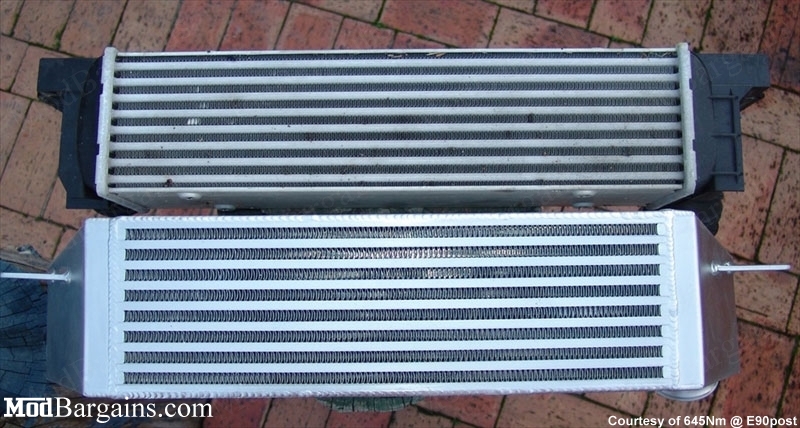
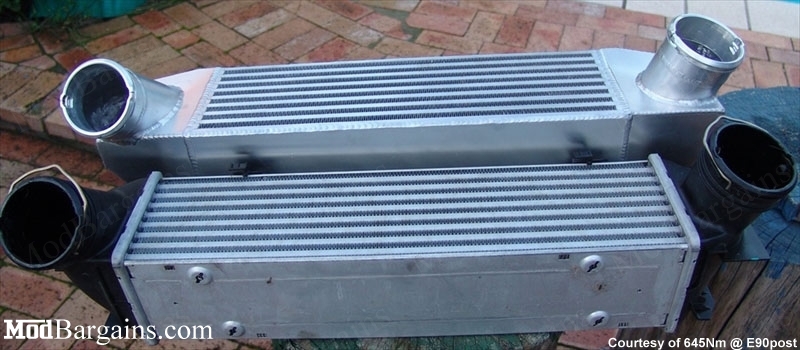
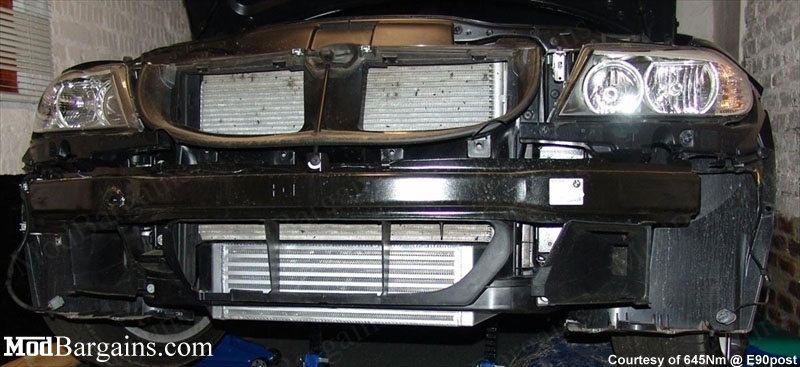
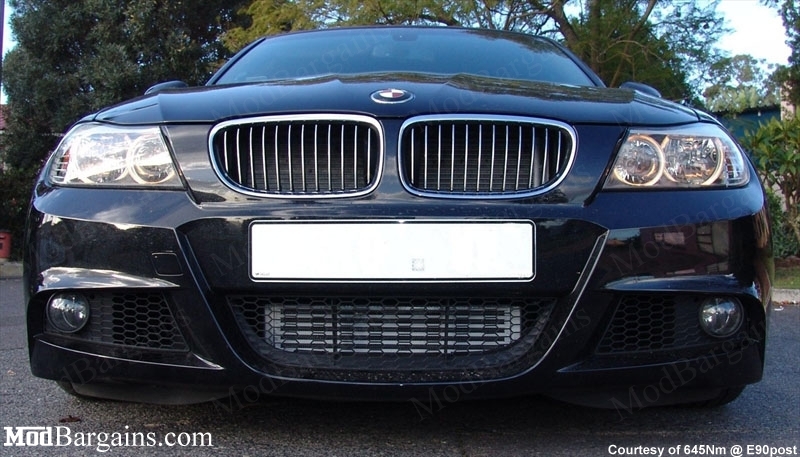
The following review is courtesy of 645Nm from E90post.com
The RPI intercooler looks stunning on its own and in the car but I had to get rid of the RPI logo, not because I have anything against the company logo, I wanted the intercooler to appear stock once installed. With aluminum spray with a high temp tolerance, I erased the logo. Frankly, once the RPI intercooler is installed and the bumper back on, the Intercooler is still VERY noticeable behind the mesh compared to stock.
It took my brother and I, exactly 1 hour and 30 minutes to install the RPI intercooler. The install process was really easy for me as a novice. The only difficult part was lifting the car using the jacks and bricks that were lying around.
Removing the covers and bumper was a breeze I read on the forum some people installed the RPI Intercooler without removing the front bumper. I think it can be done; but it is so much easier if you can see what you are doing by removing the bumper.
Basic tools are needed which you can pick up at your local hardware store such as basic metric sockets, screwdrivers, torx bit, ratchet handle and maybe an extension.
Removing the stock intercooler after unclipping it from its connectors will literally slide out. This you can do on your own without any help. The attach pictures show how small it is compared to its replacement and certainly MUCH lighter.
Pushing the RPI intercooler into the gap is not easy because it is much larger than the stock unit. One person cannot do this alone. I had to use my feet as well to push the new unit into place. But once in and the clips on the connecting pipes clicked in (make sure you hear those clips click in place); two screws fastened the job is done. All that remained was the bumper and bottom covers refitted.
When you start up the car a little bit of smoke and funny smells will come from the exhaust, probably the Intercooler cleaning itself? But after a quick drive it will be back to normal. Well not actually!
But before I describe the new driving experience let me share some of my concerns:
1. The stock intercooler had dirty blow back oil on both sides of the connecting pipes that will certainly find their way into the turbos and filter intakes. It is disconcerting for a car with only 4 000km on the clock. Without an oil catch can this will happen with the new intercooler as well. BMW engineers better fix this!
2. The RPI intercooler does not have any hooks or holes at the bottom to attach the bottom car covers at high speeds the wind lifted/pushing into or down the bottom covers there is no other way to attach the covers. With the stock Intercooler the covers screwed into the stock intercooler holding everything nicely in place.
3. The RPI intercooler does not require any cutting or modifications to the bumper/covers or the plastic housing of the radiator. But due to its size the RPI intercooler does bend some of the existing plastics below the radiator. This will not cause permanent damage but it is not an exact fit.
4. My first install attempt flopped . I did not properly connect the intercooler pipes with the stock pipes. The left hand side pipes were connected properly but the damn pipes on the right slipped out because the clip was not correctly inserted. So when I took the car for a test drive I had quite a few limp modes with reduced power. From the advice of some of the forum members such as oddjob2021 and Mariopalza, I was able to trace and fix the problem thanks guys.
The drive
The sound is the first thing that changed. The exhaust tone is louder, deeper and throatier outside and inside the cabin (but a nice racy sound). The ssssh of the BMS dual cone filters appears less pronounced.
But the car feels less enthusiastic almost lethargic at lower revs in D and DS modes. But the moment you push it above 3000rpm, the devil is let loose. The butt dyno pull is even and strong. Drive feels much smoother compared to stock. The car runs cooler and the engine oil temp remains shy of the 120 degree Celsius.
Another good investment.

![No Longer Available - Active Autowerke Intercooler for 2007-13 BMW 335i [E90/E92] N54/N55](https://cdn11.bigcommerce.com/s-ldaxybx767/images/stencil/500x659/products/37121/168653/Activeauto_Intercooler_Kit_BMW_e92_335i_KY_1203962145__02131.1583271319.jpg?c=3 "No Longer Available - Active Autowerke Intercooler for 2007-13 BMW 335i [E90/E92] N54/N55")
![No Longer Available - COBB Tuning Turbo-back Exhaust for 2007-11 N54 BMW 335i [E90/E92/E93] 5B2302](https://cdn11.bigcommerce.com/s-ldaxybx767/images/stencil/500x659/products/35772/164789/_1403880284__43807.1583269170.jpg?c=3 "No Longer Available - COBB Tuning Turbo-back Exhaust for 2007-11 N54 BMW 335i [E90/E92/E93] 5B2302")
![No Longer Available - BMW Performance Exhaust for 2007-13 BMW 325i/328i/330i/335i [E90/E92/E93]](https://cdn11.bigcommerce.com/s-ldaxybx767/images/stencil/500x659/products/38496/173063/_1458662718__58262.1586801799.jpg?c=3 "No Longer Available - BMW Performance Exhaust for 2007-13 BMW 325i/328i/330i/335i [E90/E92/E93]")
![No Longer Available - Vanguard Cat-Back Exhaust for 2007-13 BMW 335i/is [E90/E92/E93]](https://cdn11.bigcommerce.com/s-ldaxybx767/images/stencil/500x659/products/29786/147532/_1457085425__24056.1584034998.jpg?c=3 "No Longer Available - Vanguard Cat-Back Exhaust for 2007-13 BMW 335i/is [E90/E92/E93]")
![No Longer Available - TiTek N54 Charge Pipe for 2007-13 BMW 135i/335i [E82/E90/E92] (HKS SSQV)](https://cdn11.bigcommerce.com/s-ldaxybx767/images/stencil/500x659/products/33436/158589/_1267185820__86172.1583265682.jpg?c=3 "No Longer Available - TiTek N54 Charge Pipe for 2007-13 BMW 135i/335i [E82/E90/E92] (HKS SSQV)")